Back in 2012 when I picked up crocheting again, I was determined to make a crochet temperature blanket! I loved the idea! Some people may find temperature blankets tacky, and that’s fine, but I always was fascinated with the idea. I remember getting all the yarn and finishing one entire row before I quit. One row. I got tired of it after one row.
I was so lulled by the idea of the same stupid stitch 100 times a day that I threw the idea out pretty quickly. Still, I wanted to make one. I hated that I couldn’t commit to it, but I’m squirrely. If something isn’t fun or takes too long, I’ll get discouraged before I really get started and just quit. Yep, I’m a quitter.
That’s why when I finally finished a crochet temperature blanket in 2022, after 10 years of trying, failing, and being entirely overwhelmed, I was ecstatic! I finally found a blanket that I could do every day without it feeling overwhelming, boring, a drudgery, an eternity, or otherwise impossible. There were certain steps I took to ensure success that I really feel were helpful, so I compiled them here for you!
#1 Set an Alarm
I am well aware of my ability to forget things. When I began and even after it had become routine, there were times my morning got distracted. I made sure to set an alarm at 8am every day to make sure I at least log the temperature down. I have had the same 8am alarm set since January 8th, 2022 when I started my first successful temperature blanket. You read that right: January 8th. When I made my first blanket, it was a spontaneous decision one week into the new year to finally make one. I went to Weather Underground to pull up the past 7 days I missed of temperatures, I ordered Michael’s same-day delivery on yarn, and I randomly worked out a pattern I decided to commit to. I was sure I’d quit this project too, and amazed I actually stuck it through!
#2 Add It To Your Daily Routine
Many of these tips work together to ultimately bring success, and part of building a new routine or habit is to make a reminder to do so. Part of setting the alarm is to build a new habit into your routine. Many people at least have some method to their madness in the morning or evening. Pick where in your daily do’s you can add this project in and slowly build the new habit. You’ll find the alarm less and less necessary, and the project will become a part of your every day norm. For me, after my first blanket, the idea of not continuing felt wrong. It had become such a solid part of my morning ritual. The same ended up being true of my 12 year old daughter who finished her first temperature blanket this past year (2024) and insisted she wouldn’t commit to another one, only for January 4th to roll around and she decided it felt wrong to not have it part of her evening anymore. We got her the yarn and she’s now working on a 2025 temperature blanket. A daily commitment is important for me since I tend to easily get overwhelmed and want to quit. There have been times where I had to let the project go for a day or three and catch up, but I could never fall more than a week behind or I’m liable to quit. Again, I’m a quitter. I can’t do projects like this by the week. I can manage a few minutes a day, but carving out a chunk of 30 minutes-an hour or more, that’s more difficult for me. I can spare 8 minutes… I struggle to find an hour to do a week’s worth. Breaking it down into a weekend project works for many people, though! Some log temperatures all week long and just work on it on the weekends with great success! I cannot. I have to take it small bites at a time or I’ll choke and the project will die.
#3 Use Temp Log as a Reminder
I use a bright yellow notebook for my temperature logging. My daughter uses some of the printables I designed and sell in my Etsy shop with some of the patterns for temperature blankets available. She keeps hers in a folder on her bed so when she heads upstairs for the evening, she sees it and remembers to work on her blanket. Mine catches the eye and if I still haven’t worked on my blanket for the day, I put it on the corner of my dresser which happens to be on the way to the bathroom. I can’t miss it. It’s my reminder to do it if time restraints otherwise kept me from getting it done that day. Like I said, these tips play on each other, so this flows into the next tip:
#4 Keep Project in an Easy Access/Visible Location
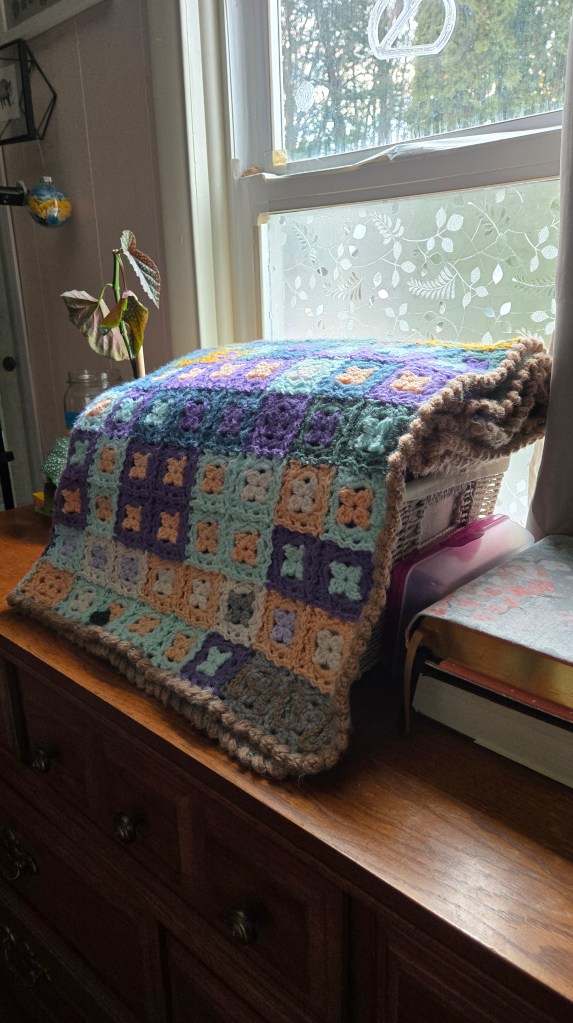
My project sits on my dresser. The yarn is right under the blanket in a basket, the scissors, hooks, and needles are right next to it, and the jar for yarn scraps sits nearby as well. All I need for the project are right there, easy to access and clearly visible. Being visible is a reminder to do it and easy access means I’m more likely to commit to it. If I were not able to keep it there, I would probably keep it in a designated basket or tote in the living room or somewhere visible. I would make it as easy as possible to grab, work on, and put away. I guarantee if I have to dig yarn out or unbury my project, I’m going to neglect it. That’s definitely a me issue but it’s true regardless that having something within easy reach makes you more likely to, well, reach for it! This then plays into my next piece of advice:
#5 Make a(n Enjoyable) Space for It
None of these tips are a requirement by any means, and there are certainly exceptions to the rule. I have a small house (about 1052 sq ft) and a family of 8. Space is a commodity and having “designated spaces” is, well, there are few of them. I have a bad habit of making things pile up when they don’t have a home on available surfaces. Back when we were a smaller family, the table used to be pushed against the wall and the back of the table became a catchers mitt for the oddball items that got used and didn’t necessarily have a home or needed to get put away in some obscure, hard-to-access place. I have a unit near my door that often gets cluttered and decluttered on a weekly basis due to it’s catch-all job. My dresser used to be the same way, housing papers that needed filed, winter gear that needed to be accessible but didn’t have a home, sewing or crafting tools that were in use or just used, and so forth. It would add up quickly. I converted my dresser from a catch-all spot into my temperature blanket project space. It’s nice because it’s not just convenient, it’s cozy. It turned what normally would have been a cluttered space into a nice project spot. Instead of papers, obscure articles of clothing, and random crafting gear, I now have my blanket, plants, and Bible study tools. I can look out the window while I work on my blanket project and then plop my Bible on top of it all and do that there, too! Because I want that space to stay clear for working on my project every day, it no longer becomes a hub for odd items. My dresser stays cleaner, my brain feels better, and that space is now very enjoyable to me. The window means I can watch my kids or soak in some sunlight there. The height of my dresser means I can comfortably stand and work. All in all, I enjoy my time there, and it’s part of what draws me to the project every morning. Having an enjoyable space is not something I thought of when I started. Honestly I sort of just added it to my dresser, but I had to move things to make space for it. I cleaned off my dresser, put my project there, and now my dresser never becomes messy and I acquired something I didn’t think I’d ever have: a designated crochet space! But the most enjoyable of spaces is not going to keep you going when the project is mundane, so…
#6 Pick a Pattern You Enjoy
My first and all my subsequent failures stemmed from feelings of overwhelm due to boredom. I love crocheting. I hate monotony. It’s why I’m not sure how people have craft stalls and stocks of the same item. I get tired of making the same things on repeat REALLY fast. Part of the joy of crocheting for me is doing new things or trying new ideas. So if I can barely commit to doing the same project over and over again, imagine how difficult it was for me to commit to rows of single crochet every single day. Even trying to do a seed stitch was overwhelmingly boring to me. How was I going to find something that I actually wouldn’t grow tired of? Enter: the square. The day I ordered from Michaels for same day delivery, I took the time waiting for the yarn to decide what to do. I thought “…what about squares? Oh I don’t want to have to sew them together… but what if I just slip stitched them together while I finished the final row? Yeah! But… how do I lay out a 365 day year into a blanket full of squares?”. Then I spent that entire time doing an ungodly amount of math trying to decide how to break down the squares and finally settled on a configuration that only added 2-3 extra squares (depending on leap year), and I figured I could just stitch the year there to make them functional squares. Something about a simple two row granny was super appealing to me. Not only was it fun to join the squares together every day, but the 2 row granny in a single color took me about 4 minutes flat to make. It was interesting enough to keep me going and easy enough to remember. Even the most fun patterns can seem to be burdensome, though. After a while, it can still get a bit monotonous, the colors don’t change much, and my brain is sighing. That’s when I would just remind myself:
#7 Remember: It Takes Less Than 10 Minutes (usually)
For the most part, many temperature blanket patterns don’t take longer than 10 minutes. In fact, my granny square took less than 5. On those days where I really wasn’t interested in doing it, I’d put on a song and just force myself to start while enjoying the song, knowing that I was going to be done not long after the song was. Sometimes I would just start and remind myself that it wouldn’t take long at all. Before I could really start complaining in my head about doing it, I’d be finished. I enjoyed that about my mini granny square blanket. After I finished that blanket, I challenged myself to do a slightly more complex pattern and designed a mini french square blanket. The resulting square went from taking 4 minutes a day to 6-7 minutes. It was an annoying adjustment but still less than 10 minutes and still easy enough to commit to. I decided to challenge myself further and for the next year incorporate color changes for my bloom square blanket design. This took a solid 7-8 minutes due to the color changes, but still entirely doable. I even stuck to it even though the colors bothered me. For 2025 I’m back to the mini granny square but this time it has 3 rows and 3 colors per square! It is averaging me about 8 minutes a day, and almost half of that time is sewing in tails and changing colors. It still takes under 10 minutes a day. It still fits within my morning routine. But I love that every year I’m challenging myself further. Admittedly, if I’m still around for 2026, I’d like to go back to the easy of the mini granny square and single colors blocks. I don’t want to give up my routine, but I also like the quickness of the 4 minute square.
If I had to pick a tip that helped most, I’d say it’s #6 hands-down. If I’m not having fun, why do it? Seriously… why do it? Granted, stubbornness played a large role in me wanting to try for the umpteenth time to succeed, but really nobody is twisting my arm (or yours) to do this. Do what you enjoy!
I have an idea in mind for a temperature blanket alternative (and there are plenty of alternatives out there!) but that’s a post for another day.
For those of you who have succeeded in making a temperature blanket, what tips do you have? What has been successful (or unsuccessful) for you? For those who failed to commit, what do you think got in the way of success? For those interested in trying but overwhelmed, what kind of questions or reservations do you have about starting a project like this? I’d love to hear your thoughts in the comments!
Have a blessed day!
